- Sky
- Blueberry
- Slate
- Blackcurrant
- Watermelon
- Strawberry
- Orange
- Banana
- Apple
- Emerald
- Chocolate
- Charcoal

jeanpierrem
-
Content count
3,685 -
Donations
30.00 EUR -
Joined
-
Last visited
-
Days Won
272
Posts posted by jeanpierrem
-
-
Bonjour

Jean Pierre
-
 13
13
-
-
Bonjour Louis
Contrôle ton paramètre

Une fois j'avais perdu mes signaux a cause de ça
il etais descendu tout seul va comprendre les mystères de TS
Densité du paysage a fond
Jean Pierre
-
Bonjour
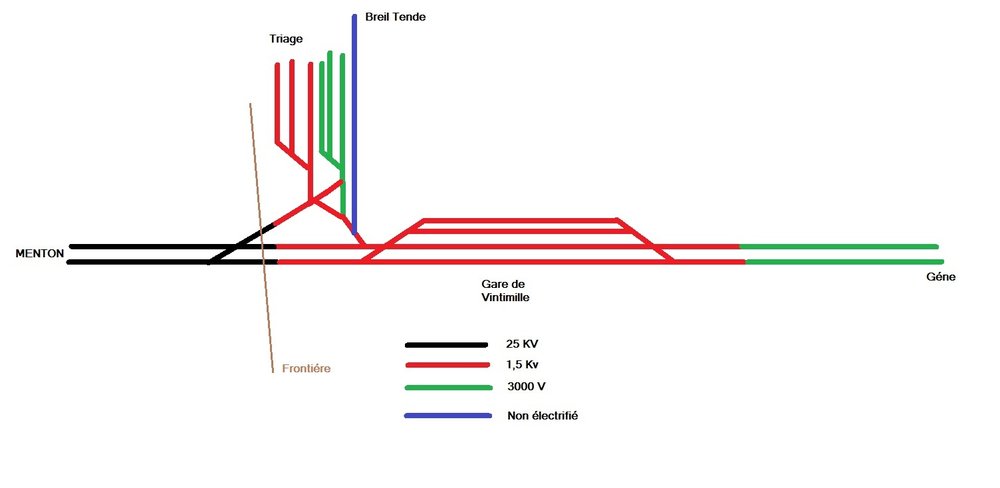
Pour l'electrification sur la zone de Vintimille c'est çà
JP
-
 1
1
-
-
Bonsoir
Il y a 1 heure, Paranier a dit :Bonsoir,
Je relance le sujet car j'ai les lignes Lyon-Marseille en TGV et Marseille-Toulon, je compte les faire fusionner pour faire circuler des TGV entre Toulon et Lyon (TGV Nice-Lyon par exemple) dans le cadre d'un scénario. Vous pensez que ce type de fusion est envisageable ?
C'est faisable

Jean Pierre
-
2
-
-
Je dirais simplement qu'en tant que créateur et ayant fait quelques lignes je parlerai de la section Toulon Marseille
Pas parfaite il y a des cassures et pas de devers mais la signalisation correspond a la réalité
J'en suis conscient mais c'est la limite de mes connaissances de l'éditeur
Et je tire mon chapeau a Richard qui ce crée ses assets et je pense que comme moi il sais que l'on a pas atteins la perfection mais c'est notre rêve et je pense que vu notre age on a le mérite d'avoir au moins tenter de faire quelque chose et de contribuer a créer pour nous faire plaisir et partager pour exemple l'AGC
Nous ne sommes pas né avec un ordi dans les mains mais avons tenter de comprendre
Aujourd'hui je ne fait plus de ligne mais j'apporte ma contribution dans la pose de la signalisation ou la création d'objets au moins j'ai le merci du créateur de la ligne
ce qui me suffit amplement et qu'il soit remercié pour les lignes qu'ils créent
Jean Pierre
PS Merci Julien pour ce forum
-
9
-
1
-
-
Bonjour
Oui mais le problème camille c'est que les gens critiquent plus facilement que de dire merci sinon, je dirai pas la critique mais les avis ou les conseils seraient mieux acceptées.
Jean Pierre
-
3
-
1
-
-
Bonjour
Je te comprends
") JP
JP
-
merci TVM je viens de découvrir Note Pad

C'est vrai que ça change la vie

Jean Pierre
-
1
-
-
Perso je les ouvre avec le Bloc note de windows
ça marche très bien y compris pour apporter des modifs.
Jean Pierre
-
Bonjour
Même si c'est pas trop mon style de loco bravo pour ton très beau travail de reskin
Jean Pierre
-
1
-
-
Bonjour Bernard
Idem j'ai des lua n’hésite pas donne la liste
Amicalement
Jean Pierre
PS je viens de voir il y a un luac.exe au milieu des fichiers lua
-
Je pense que c'est plutôt une BB 306

JP
-
5
-
-
Bonjour
Superbe boulot merci Treno

Jean Pierre
-
6
-
-
Bonjour
Simple indication la gare de départ de Drap est en légère pente il y a donc intérêt de ce mettre en très forte accélération avec l'AGC sinon il part systématiquement
en marche arrière.
Jean Pierre
PS pourriez vous me donner le n° du fichier de la ligne
-
1
-
-
Bonjour
Victor la signalisation de voie unique sur Castre n'est pas un exemple par contre sur la TDM j'ai appliqué la vraie signalisation de la ligne mais
j'ai du faire quelques adaptations pour obtenir un fonctionnement correct sur TS
Pour répondre a ta question voici un petit schéma
sachant que le sémaphore type A est a mettre au plus prés du carré et mettre le sémaphore sous le niveau du sol

Les marqueurs de quai ne doivent pas engager le sémaphore de plus comme sur la ligne Nice Tende les trains sont reçus sur voie de gauche
Ce système te permet d'avoir des trains AI en scénario standard sans risque de face a face et te permettra en parcours libre de passer par n'importe
quelle voie
Voici 2 croisements en scénario standard sur la TdM
Un en gare de Peille l'AGC arrive de L'Escaréne
Je conduit l'AGC en attente devant le carré

Un en gare de l'Escaréne
J'ai attendu l'arrivée du train travaux

Bon jeu
Jean Pierre
-
1
-
-
Bonjour
oui GSI
Jean Pierre
-
Bonjour Pierre
Ils avaient bien souvent le haut des parois déformée
Jean Pierre
-
Il me semble sur le modèle que tu nous avais envoyé que la couleur des faces coté cour et coté quai était différente j'ai donc appliqué la couleur coté quai
sur le coté cour pour que ce soit plus equilibré
JP
-
Petit test de remplacement de couleur

JP
-
3
-
-
met plutôt 2000 enfin c'est ce que je met sur mes créations
-
c'est probablement ton extension du fichier textures qui te pose problème
JP
Soit DDS soit ACE
pour DDS moi j'ai pas de soucis par contre Pierre utilise le ACE
-
Non c'est les node que tu dois changer en 1_2000_xxx
2000 étant la distance d'affichage il faut pas mettre trop moi en général je met 2000
JP
-
Si tu veux passe moi ton fichier source en MP je regarderai si ca passe chez moi
JP
-
Bonjour
Simple comparatif sur un export en Scenery BP

Je comprend pas pourquoi tu as ce "c" devant Scenery blueprint
JP
-
1
-


Atmosphères ferroviaires (5 captures maximum et par jour !)
in Captures d'écran et vidéos
Posted
Bonsoir
JP